
To be honest, I started to write this blog post first time back in May 2018 but for many reasons, I haven’t been able to finalize it before. Here it finally comes. Maybe it was worthwhile to wait and get Microsoft Cloud App Security in the game together with Azure ATP.
What’s Azure Advanced Threat Protection?
Azure ATP is a cloud-based service to protect environments from cyber-attacks and inside threads. Microsoft Threat Protection concept contains different products which might be a bit confusing, which product to use to in which scenario, descriptions from docs.microsoft.com.
- Advanced Threat Analytics (ATA) – on-premises service that helps protect your enterprise from multiple types of advanced targeted cyber-attacks and insider threats
- Azure ATP – cloud-based service that leverage on-premises Active Directory signals to identify, detect and investigate advanced threats, compromised identities, and malicious insiders’ actions
- Windows Defender ATP – client-side threat protection, a platform designed to help enterprise networks prevent, detect, investigate, and respond to advanced threats.
- Office 365 ATP – Advanced Threat Protection e-mail filtering service
Worth to mention is that Azure ATP is cloud-based evolution to the on-premises ATA solution even it’s not a direct replacement for on-premise ATA. AATP has integrations to other Microsoft products, including MCAS, Sentinel which ATA doesn’t have. Detailed information about what you can achieve with Azure ATP (docs.microsoft.com).
ATP Architecture (port mirroring / ATP sensor)

Configuring Azure ATP with Sensors (short version)
Complete guidance is found from docs.microsoft.com
- Create a workspace in the workspace management portal
- Connect to AD
- Download, install Azure ATP sensor (.Net 4.7 required)
- Configure ATP settings
- Advanced configuration
- VPN Integration
- Exclusion and honeytoken accounts
- Configure SAM-R required permissions
Verify and validate
After sensor installation Domain Controllers which have a sensor installed will appear to the ATP workspace portal.

Validate installation performing the following actions:
- Check that the service named Azure Advanced Threat Protection sensor is running. After you save the Azure ATP sensor settings, it might take a few seconds for the service to start.

- If the service does not start, review the “Microsoft.Tri.sensor-Errors.log” file located in the following default folder, “%programfiles%\Azure Advanced Threat Protection sensor\Version X\Logs”.
- Go to your workspace URL. In the workspace portal, search for something in the search bar, such as a user or a group on your domain.
That’s it, ATP service is up and running and collecting data from Domain Controllers. To cover different use cases and scenarios, here are links to Microsoft complete guidance:
Advanced scenarios covered links below:
Microsoft Cloud App Security (MCAS) Integration
Integrate AATP To Cloud App Security
When Azure ATP (AATP) came out it had only its own portal available where generated alerts were found. Nowadays, there is a possibility to integrate AATP to MCAS to get events to unified SecOps experience which focuses on identity-based alerts. Worth to mention – both ATP & MCAS are providers for Intelligent Security Graph (IGS) and alerts are found also from IGS.
The new investigation priority score combines information from AATP, MCAS, and Azure AD Identity Protection, the description below from docs.microsoft.com
To calculate the Investigation Priority, we assess the investigation urgency of each specific user, using security alerts, abnormal activities, and potential business and asset impact related to each user. For every Azure Active Directory user, we then build a dynamic Investigation Priority Score, based on intelligence built from Azure ATP, Microsoft Cloud App Security as well as Azure AD Identity Protection – which is continually updated based on recent behavior and impact.
How to make integration? MCAS – Settings – Azure ATP – select integration

Investigate Alerts in MCAS
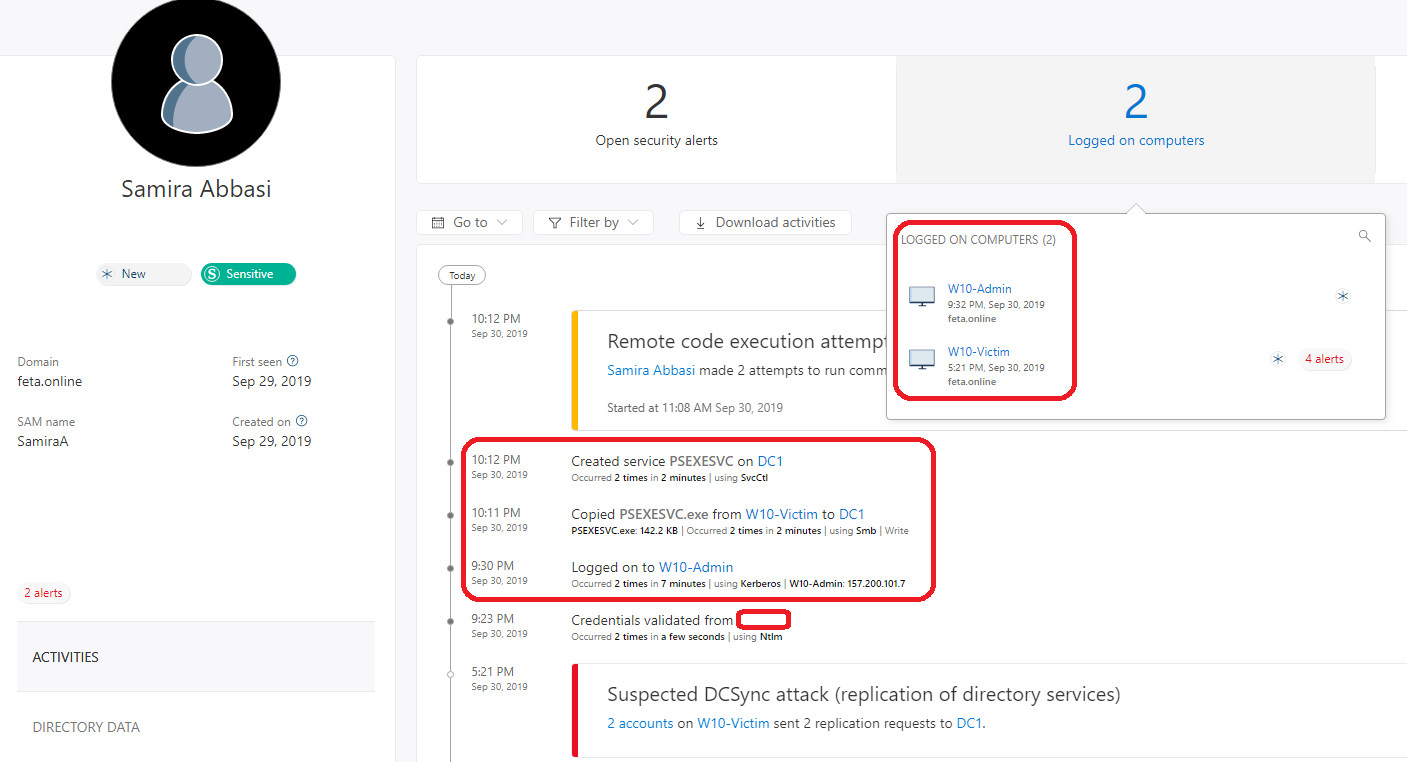
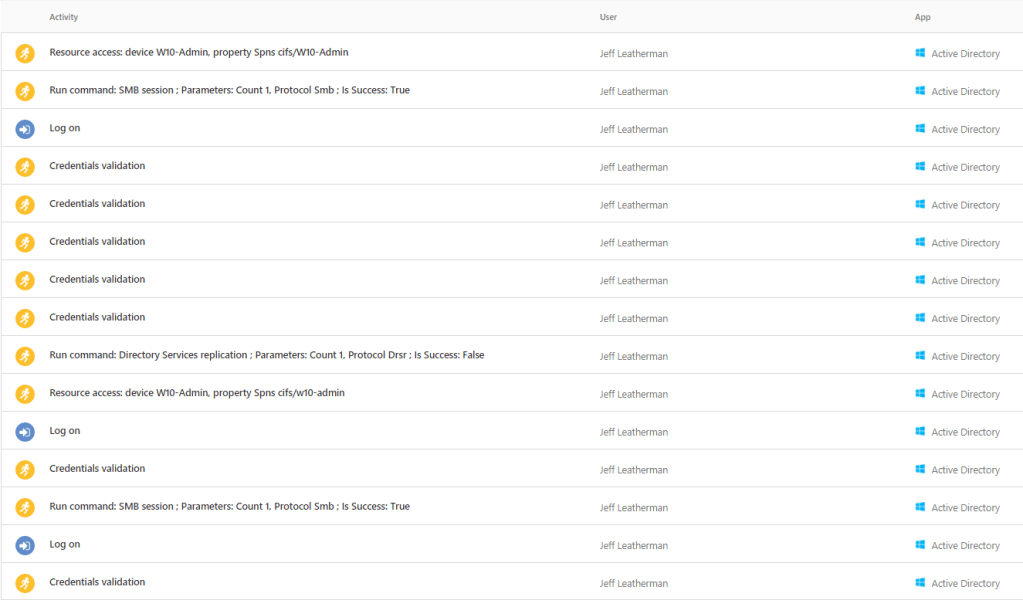
After simulating attacks in my on-premises environment I received following alerts from sensors to the AATP portal. Attacks generated were
- Simulate a Reconnaissance attack including network mapping, directory service & SMS reconnaissance
- Lateral movement attack including domain escalation
- Domain dominance attack including remote code execution, malicious replication, golden ticket etc.
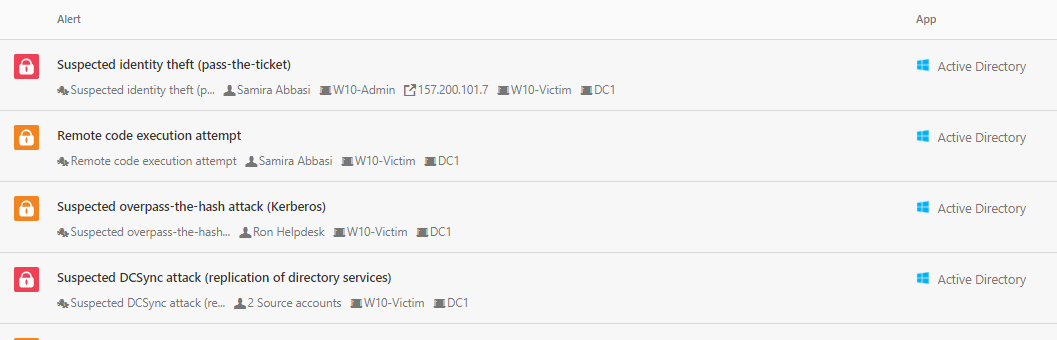
These attacks generated the following alerts:
- Suspected DCSyn attack
- Suspected overpass-the-hash attack
- Remote code execution attempt
- User and IP address reconnaissance (SMB)

From the ATP portal, I started to investigate the “Remote code execution attempt” & “Suspected identity theft” and I could quickly identify that there are possible compromised computers and user accounts that need more investigation.


With integration in place, alerts are found from the MCAS portal which has maybe the best identity investigation capabilities in the Microsoft cloud ecosystem (and I’m a fan of Sentinel).
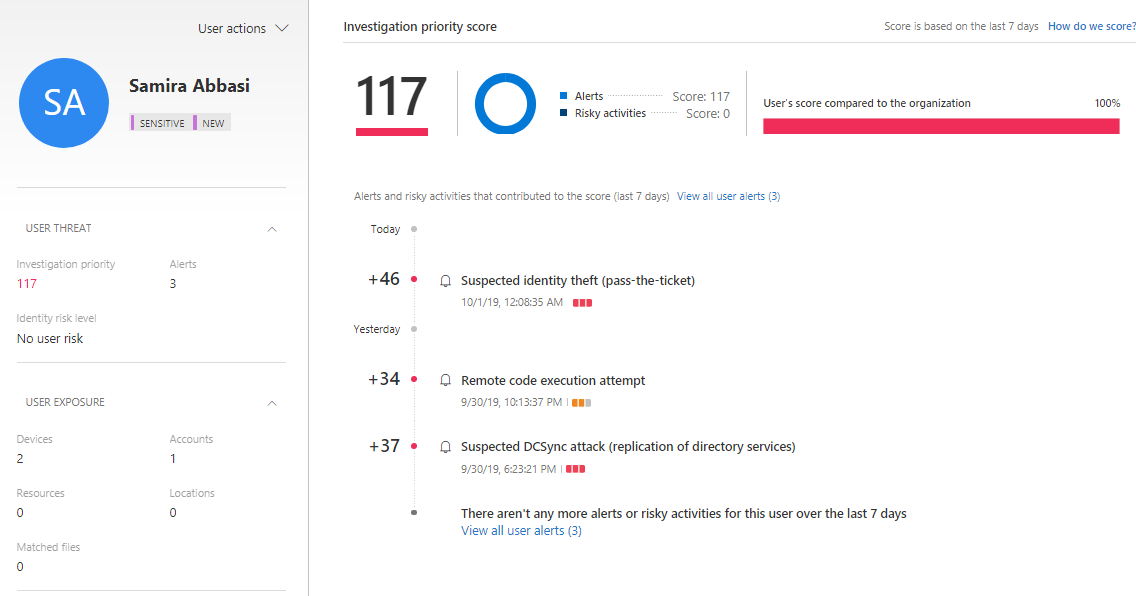

Identity Score in MCAS
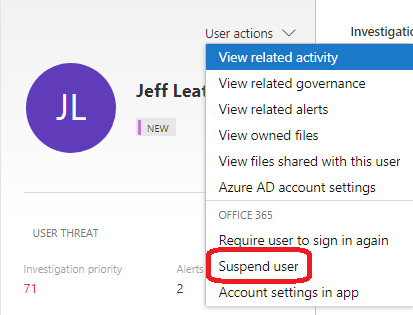
The new Identity score calculates user risk in the organization. From the user page, immediate actions can be taken if needed, suspend a user or require new sign-in. Together with MCAS Activity Log, you will get a pretty good understanding of what potential malicious user has done in the environment.
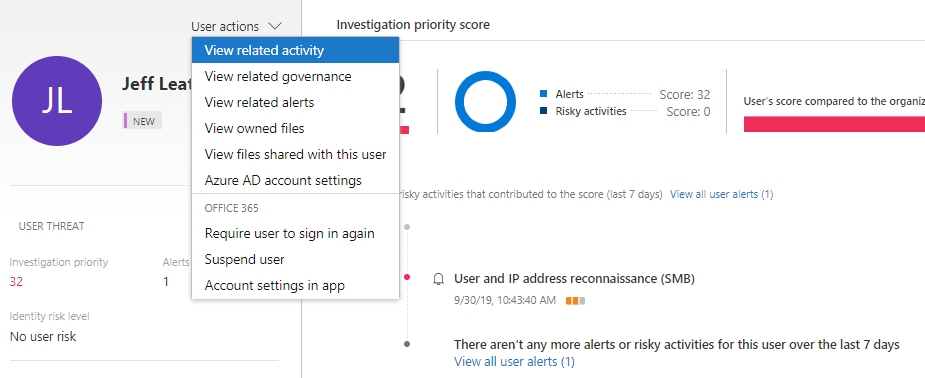
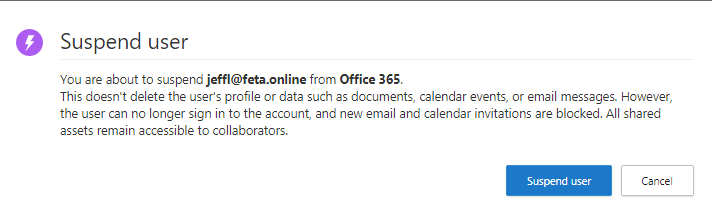
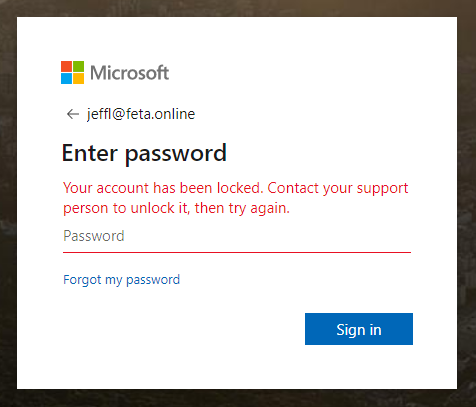
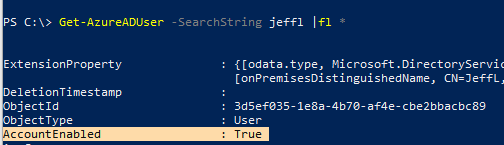
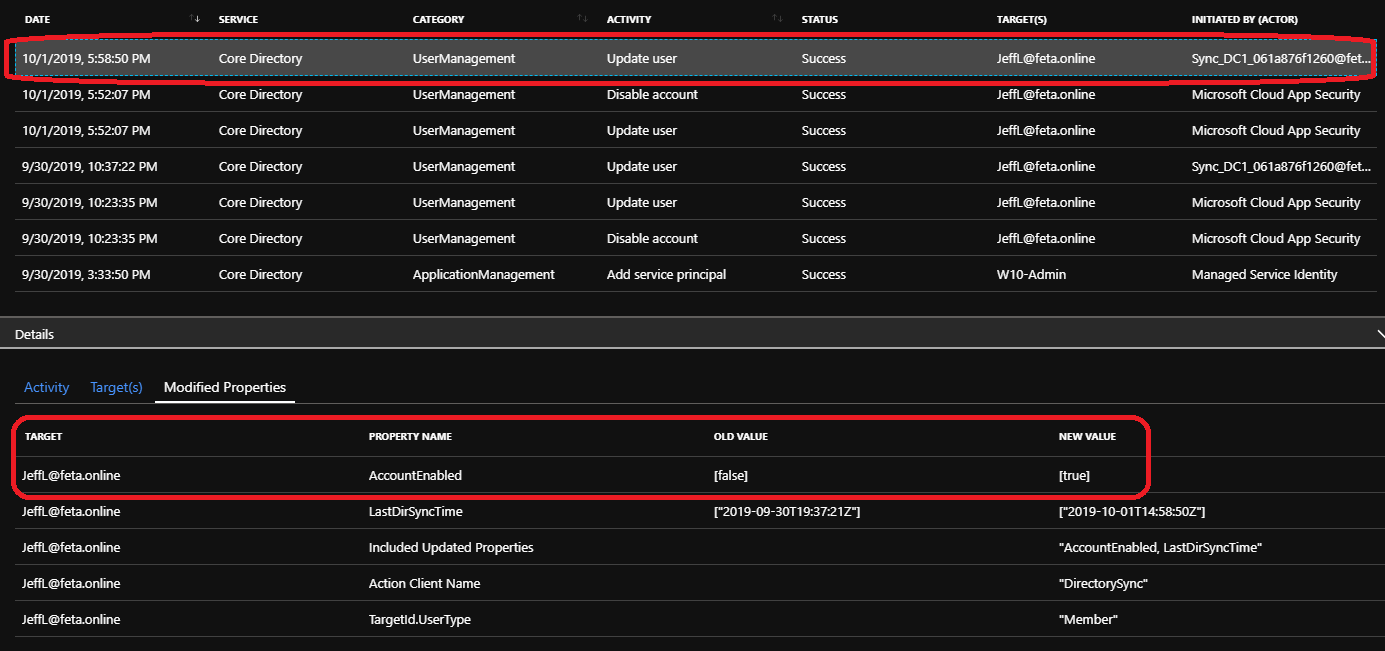
You find compromised account and want immediately to block access to the O365 environment, no problem, it’s possible from the MCAS Identity user page. When the user tries to sign-in he/she gets information “Your account is locked”.
Disclaimer: During tests, the account was automatically enabled during the next AAD Connect sync cycle. This mechanism works as expected with cloud-only users but if Azure AD Connect syncs users it will override the setting in the next sync cycle.


Reference
Instructions on how to create alerts:
Investigate Risky Users in MCAS
Summary
I’m starting to be a big fan of Microsoft Cloud App Security. It provides maybe the best capabilities from Microsoft stack for visibility to find malicious activities from the Microsoft cloud ecosystem and of course other functions, that are not covered in this blog post. Until next time!

In the disclaimer on the bottom of the article- was the user automatically enabled or disabled? You might missed this statement.